
|
|
| SELECTedge: Installation | ||
Fast Installation
Installation of the SELECTedge border stones is fast and simple. Just follow the easy installations instructions below.
To begin you will need the following:
| Materials | Tools |
SELECTedge Units - 32 Units = 40" Diameter Ring Edging Sand = 1 cubic foot for 20 linear feet of Edging |
- Shovel
Rubber Mallet (or Hammer with a length of 2x4)
- Grub Hoe (optional) - Tape Measure (optional) - String (or Spray Paint, or Garden Hose) (optional) |
Following this step-by-step instructions:
1. Lay out your border plan and mark it with string, spray paint or garden hose. (Placing SELECTedge Units in position on the grass or soil will help you determine your best plan.)
2. Decide if you'd like to install your SELECTedge border flush with your lawn or slightly raised. (Maximum recommended reveal: 1" above surrounding surfaces.)
3. Dig a 4" - wide trench deep enough to allow for the height of a SELECTedge Unit set to your desired depth plus a 2" bed of sand.
4. Pour, and level a 2" sand base in the trench.
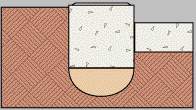
5. Install SELECTedge Units as shown below.
6. Seat each unit by tamping it down with a rubber mallet (or lay a 2x4 across several units and sharply tap its midpoint with a hammer).
7. Backfill spaces, between the units and the trench walls, with loose dirt and step it down firmly.
That's it. You've just created the most permanent, maintenance-free landscape border available.