|
|
| StoneWall Select: Installation | ||
Walls up to 3 feet
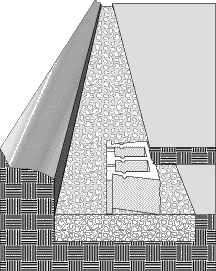
First, plan your layoutDevelop a precise plan for your wall construction by first analyzing your site. Noting slope and drainage patterns, be sure to route rainwater around wall ends, not over the top. Contact your StoneWall SELECT Distributor with questions about special site considerations. Second, prepare the foundationStrip top soil and vegetation and dig a trench 30" wide along the planned path of the new wall. The depth of the trench will equal 12", 6" for base, 6" for unit embedment. The ground at the bottom of the trench should be stable and compacted with a vibrating, mechanical plate. Lay in a 6" base of compacted gravel for leveling the base course. |
 |
 |
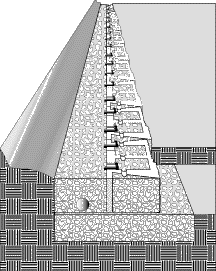
Third, lay the base courseLay a row of StoneWall SELECT units edge to edge on the prepared foundation with the clip grooves up. Check for straightness with a string line. Level each unit. Do not pitch the unit forward. Install drain tile at grade to route water away from the wall. Use crushed stone to backfill 6" to 12" behind the base course and every successive course. The large cores in each unit must also be filled with the same material. Always compact the drainage stone and soil backfill, behind the stone, after installing each course. Slide two interlock clips onto the back of each unit in the clip grooves, with the single leg of each clip extending up and toward the front (see Basic Installation 1 & 2, pg 3). |
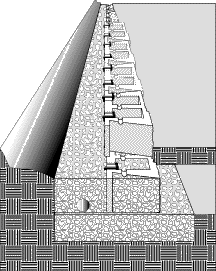
Fourth, install additional coursesStagger (half bond) the second course on top of the base course by positioning the sides of each upper unit over the center webs of two lower units, with the upright legs of two interlock clips extending into the cores of the upper unit. Then slide the unit forward until it rests tightly against the legs of the two clips (see Basic Installation 3 & 4, pg 3). The clips and the tapered core of the unit automatically establish a setback of 3/4". Backfill and slide two clips onto each unit of the second course, and repeat the process for successive courses (without drain tile). Finally, finish your wall with one of a variety of cap options. All caps are secured with a flexible, high-strength adhesive. Contact your StoneWall SELECT distributor for selection and details. |
 |
Unit Fill including Min 6" Backfill |
= 0.04 yds3 per ft2 of SWS Wall Area |
Base Material |
= 0.14 yds3 per ft2 of SWS Wall Length |